Tuesday, November 27, 2012

Strawberry Charlotte (Carlota de fresa)


This Strawberry Charlotte recipe is a super easy icebox dessert from latinoamericano origins, known as Carlota de fresa.  I first had it in the lime flavor (Carlota de limón or Pay de limón) and fell in love with it at first bite.  My friend Vicki gave me the recipe and I only modified it by adding granulated sugar.  It is so easy to make and so delicious.  So delicious that I wish I were a pro-blogging photographer because these lame-o pictures do not do it justice.

You'll need:
Sour cream, frozen strawberries (thawed), galletas Marias (cookies), granulated sugar, evaporated milk, sweetened condensed milk and a lime.

Puree the thawed strawberries, sugar, and lime juice...


...so that it looks like this.


Add the sweetened condensed milk.


Add part of the evaporated milk and sour cream, blend.


My blender isn't big enough for all of the ingredients so I have to pour half of it into a bowl.


I add the other half of the sour cream to what's left in the blender, puree it, then pour it in with the rest of the mixture and with a spatula I mix it all together.


Spread some of the strawberry mixture onto the bottom of a 9x13 in. dish.


Dip the cookies one at a time for just a second into the remaining evaporated milk.


Put a layer of cookies at the bottom of the dish, you might have to break some up to fit them in just right.


Spread some of the mixture over the cookies, just enough to cover them completely.


Repeat the layering process several times...


until you almost reach the top of the dish, maybe about half an inch from the top; this will be your final cookie layer.


Spread the remaining strawberry cream over the cookies.  It should be a thicker layer at the top.


Freeze it for at least an hour.  If you freeze it longer than that, thaw it for 15 to 30 min. (depending on the room temperature) before serving.


Strawberry Charlotte (Carlota de fresa)

Ingredients:
16 oz. bag frozen strawberries, thawed
1/2 cup granulated sugar
juice of 1 lime
14 oz. can sweetened condensed milk
12 fl. oz. can evaporated milk, divided
32 oz. carton sour cream
3 (4.9 oz.) packages Maria cookies*

Directions:
1. Puree the strawberries, sugar and lime juice in a blender.  Add the sweetened condensed milk, 3/4 cup evaporated milk and sour cream, blend.  (If your blender isn't big enough like mine, you might have to divide up the ingredients and blend it in batches, then mix it altogether in a bowl.)
2. Layer a 9x13 in. dish with just enough strawberry cream to cover the bottom.  
3. Dip each cookie for just one second into the remaining evaporated milk, shaking off any excess milk.  Layer the cookies over the strawberry cream until you cover the bottom.  Spread strawberry cream over the cookie layer just enough to cover the cookies.  Repeat this process until you come to about half an inch from the top of the dish, ending with a cookie layer.  Spread the remaining strawberry cream over the final cookie layer.
4. Cover the dish with foil (my dish had a plastic cover that I used) and freeze for at least an hour before serving.  If you freeze the dish for more than an hour, thaw for 15 to 30 min. (depending on the room temperature) before serving.  It should be firm, yet soft enough for a sharp knife to cut through but not so soft that it is completely melting.

*You can find these cookies in the Mexican aisle of your grocery store.  If you can't find them, try substituting with vanilla wafer cookies.  In this recipe you might end up with some extra cookies, I usually end up with about less than half a package of cookies that didn't make it into the dish.

Variations
You can make a Lime Charlotte or a Mango Charlotte following the base of this recipe as well.  I've tried all three and I can't decide which is my favorite, they are all so good.

Lime Charlotte (Carlota de limón): Substitute the strawberries and lime juice with the juice of about 12 limes or until the juice comes to a little above the 250 ml line on your blender.  Make sure the limes are juicy!

Mango Charlotte (Carlota de mango):  Substitute the strawberries for a bag of frozen mangoes, thawed.  I couldn't find a 1 lb. bag of frozen mangoes but I think it was 14 or 15 oz. and that was close enough.


Saturday, August 25, 2012

peanut butter and pickle sandwich


I always ask for extra pickles on hamburgers and sandwiches, I suppose I just love the crunchy, vinegary tasting experience of the pickles.  But when I was in high school and I heard my friend proclaim that peanut butter and pickle sandwiches were soooooooooooo good, I was appalled that anyone would think to even put the two together.

Over the years I thought about that peanut butter and pickle sandwich my friend mentioned but never got the nerve to actually try - until now.

I started to make a peanut butter and jelly sandwich but when I went to the fridge for the strawberry jam, I noticed a lonely dill pickle lingering in a huge jar in the corner of the fridge.  I decided I'd finally make that peanut butter and pickle sandwich I had thought about every now and then for over 15 years.

So I slathered on some peanut butter and sliced up a dill pickle...

...and put the two together.

I made my sandwich all pretty,

and took one bite...

...and declared it THE MOST DISGUSTING sandwich I've ever eaten!!!

Who creates this stuff and says it's good enough to eat, and not only that, says it's soooooooooooo good?!  Probably the same people that dip fries in chocolate frosties and say it's delicious - I don't get it.  There's nothing spectacular there.

The ONLY thing that saved this sandwich from being chucked into the trash was the bread.  I used Dave's Killer Bread (Good Seed) - the best bread I've ever had.  The bread is so delicious that I made myself eat the entire sandwich, seriously, the bread is THAT good.  There was no way I was going to let that bread go to waste.

So I'm here to tell you that peanut butter and pickle sandwiches are a no go.

Don't be fooled like I was people, do not make this sandwich.  EVER.

Monday, July 30, 2012

YouTube Pregnancy Announcements

I was watching some videos on YouTube last night and suddenly I found myself watching pregnancy announcements - why I torture myself like that, I don't know.  Perhaps I'm hoping some of that vibe will rub off on me and magically get me pregnant.  I couldn't help shed tears of joy and envy as I watched grandmas squeal with delight, grandpas raise their arms rejoicing and husbands tenderly embrace their wives upon hearing the wonderful news.   Some of them were even hilarious when the grandmas screamed, making the grandpas jump out of their chairs - they still had no clue what was going on until someone spelled it out for them.

One of my favorite videos is this one:
The sister's reaction is priceless.  The mom's reaction - I can understand she was in shock.  I loved it.

Go ahead, watch some more.  Just a warning, you might end up spending 2 hours watching these videos.  They're addicting.

So, I feel like I didn't really conclude or even explain my NIAW series of posts.  The story is, I'm dealing with infertility.  It's been harder at times than others (like this past Mother's Day at church when my husband put his arm around me and I just started bawling) but it's getting better.  I can talk about it more openly now and it's been quite therapeutic.

If you are dealing with infertility, I'm sorry you are going through this heartache.  It sucks.  It really does.  But here are some things that have helped me deal with this burden:

You can check out this site for some venting.  It's a great place to get out some of that anger over dealing with infertility.  It's a safe place for us to vent amongst other ladies who know what we are going through.  If you are not dealing with infertility, please don't visit this site.  Your feelings will be hurt and you will be tempted to make comments about how bitter we are, etc., etc.  Yes, we are bitter, but we are trying to deal with it, and venting in a safe environment like this helps.
For something more positive and uplifting, check out A Blog About Love.  She recently found out that she won't be able to have children naturally, which is so heartbreaking; but she is doing her best to be positive about it - which makes me want to have a positive attitude as well.  She talks about infertility but also about marriage, fashion, travel, etc.  I have been reading this blog for a while and love it and highly recommend it - even if you aren't dealing with infertility.

Be sure to talk to a friend about your struggles with infertility.  It helps to get what we are feeling off our chest and alleviates this burden we are carrying around.  A few months ago I opened up to a friend/co-worker who revealed to me that she is dealing with infertility, and as we talked she confessed she had no idea I was dealing with infertility as well.  I thought, what?!  How could you not tell, when my husband and I have been married for almost 7 years?!  But it just goes to show that people can be really clueless about your situation, even more so for people who don't know what it's like to be infertile.  That's what prompted me to open up about infertility on Facebook and post about it on this blog, to help others know that infertility exists (it seriously never crosses their mind that you actually have been trying to have a baby!); and so that hopefully other people dealing with infertility will realize they aren't the only ones and we can help each other get through this.  We can do it.

Another important piece of advice, don't put your life on hold waiting for a baby.  I'm finally putting this into practice and I wish I would have realized this a while ago (I would have been done with graduate school by now). So, go back to school, take that vacation you've always wanted, lose the weight you've always been meaning to lose (which I actually did using an amazing program that helped me lose over 20 lbs.) and just live your life without waiting to do things "just in case" you get pregnant.

My last piece of advice is, if you are religious, pray.  Pray that Heavenly Father will give you the comfort you need to get through this trial, to give you the strength to endure it, to hand over your burden to Him and to give thanks for the blessings that you do have in your life.  Being grateful for what you do have helps out - a lot.

Take care my friends, you aren't alone.

Saturday, April 28, 2012

NIAW - Scenario No. 4


Scenario No. 4:

Susie’s infertile friend Betsy announces at a lunch with a group of friends that she and her husband are trying to get pregnant.  Betsy excitedly mentions that she is doing her first round of Clomid.  Rookie!  Susie lets out a sigh and casually says, “Well, good luck with that.  I tried it and it certainly didn’t work for me.”

DON’T:  Let Susie get inside your head!

DO:  Feel hopeful that this treatment will work for you.  Everybody is different and what doesn’t work for some can certainly work for others.  Also, understand that Susie is probably down in the dumps from the failed attempt at making a baby.  Just keep smiling; Susie could certainly use a friend in the same situation to show her what it’s like to hope and to have faith.

If you ARE Susie…           
                                                                                       
DON’T:  Be such a Debbie-Downer!!!

DO:  Express words of encouragement to your friend Betsy.  If a certain treatment didn’t work for you, zip it.  The next treatment might be the key to bringing home a baby and you definitely wouldn’t want someone to smash your dreams.  Remember, “Always be kind, for everyone is fighting a hard battle.”

Friday, April 27, 2012

NIAW - Scenario No. 3


Scenario No. 3:

Vanessa is expecting her first baby and it is time to send out invites for her skulls and pink bows themed baby shower.  Susie and Vanessa are friends but Vanessa recently saw on Facebook that Susie has confessed to everyone and their grandma that she is infertile.  What to do?! 

DON’T:  Exclude Susie from any baby related festivities.

DO:  Send Susie an invitation and leave it up to her to make that decision.  If Susie decides to go even though she might have to bring out her happy face for the event, she is showing you that she is genuinely happy for your bundle o’ joy just by being there.  But do Susie a favor and seat Meddling Aunt Matilda across the room away from Susie; you had a hard enough time dealing with Auntie May’s inquiries about finding a husband these past 10 years.  If Susie decides she better stay home, please understand that she is trying to save you from dealing with drama at what otherwise should be a happy event.  I mean, unless finding your infertile friend locked up in the bathroom bawling for 30 minutes straight is your idea of a good time, let’s just be grateful Susie sent you a gift from your registry instead.  Maybe she’ll be up for it when baby #2 decides to show up.

If you ARE Susie…

DON’T:  Think Vanessa is trying to be heartless.

DO:  Be happy for Vanessa for goodness sakes!  Would you rather her be infertile like you?!  I didn’t think so; it isn’t something we wish on anybody.  If you decide to go, good for you, I know it isn’t always easy.  If you don’t want to have to deal with any Aunt Mays, ask Vanessa if you can help with serving food or anything that will keep you busy and out of danger’s way.  If you are at a point in your infertility where it is just too much to bear, it’s okay to stay home.  Send your card and gift with a friend.  Some day you might be up for going to a baby shower again, and some day, it might be your own.  

Thursday, April 26, 2012

NIAW - Scenario No. 2


Scenario No. 2:

Martha pulled off a “Rhonda” on Susie 4 years later, but by now, Susie is tired of giving the same lame-o excuses.  I mean, the “maybe in a couple of years” excuse isn’t quite cutting it anymore.  People are starting to think Susie stinks at math.  Susie is quite matter-of-fact with Martha and explains, “We are just having a really difficult time getting pregnant.”

DON’T:  Start spewing advice left and right (unless she asks for it, of course).  Has she seen a specialist?  Most likely she’s seen every doctor in town plus a few more in the big city two hours away, not including the acupuncturist, the massage therapist, the naturopath healer, the witch doctor and DSW (it has healing powers too!).  Has she tried using Maca?  She went through three cases of the stuff and still no baby.  Has she tried to relax?  Girrrrrrrrrrrrrrrrrrrl, don’t even get me started on that one.

DO:  Get a hint.  You are prying into some very personal stuff.  Just say, “I’m sorry to hear that.  If you’d like to talk about it, I’d be happy to listen.”  She might not actually open up to you about it, but just knowing you are there to support her helps out a lot.

If you ARE Susie…

DON’T:  Expect Martha to get a hint and drop the subject.

DO:  Be prepared to hear about every possible solution Martha can think of on the spot.  Be prepared for other people to get uncomfortable when you drop the “i”-bomb on them.  Even though they asked the question, it wasn’t the answer they were expecting.  Now it’s your turn to be sympathetic.  Just shrug it off and change the subject before their eyes become cross-eyed from trying to look anywhere but your face.  Hopefully next time they’ll be a bit more sensitive about the subject.

Wednesday, April 25, 2012

NIAW - Scenario No. 1

I've decided to re-post these entries from Facebook.  I've had a few comments on these and thought it could reach more people if I posted it on my blog.  I just want whoever comes across this to know that they are not alone!


I am dealing with infertility.

In honor of National Infertility Awareness Week – wait, what?!  Yes, apparently there is an awareness week for EVERYTHING these days (Brain Awareness Week, Asbestos Awareness Week, World Hearing Aid Awareness Week, National Farm Animals Awareness Week, I Have Bunions on Both Feet Awareness Week – okay, maybe I made up that last one).

Anywhoo, back to what I was saying…I thought I’d give some tips and pointers when it comes to infertiles like me because really, who talks about infertility during 4th of July barbecues anyway?  NO ONE DOES, because it’s a taboo subject, everyone feels uncomfortable about it, the awkward silence pushes out the noise of once cackling purple-haired ladies and everyone begins to stare at their plates in hopes that Bob will call out for more hot dog eaters to pick up the semi-burnt weenies at the grill.

Let’s just say I’m going to attempt to do a little educatin’.  You can thank me later…or not, and wish I had just kept my mouth shut.

Scenario No. 1:
At a party celebrating the arrival of Chester and Tammy’s 3rd baby, Rhonda walks up to Susie and suddenly blurts out, “So Susie, when are you and John gonna get your act together?!  You ain’t gettin’ any younger!” (as Rhonda points to the baby).

DON’T:  Please don’t ever question when someone is going to start having kids.  Yes, some people choose not to have any.  But 95% of the time, they are struggling with infertility.  It doesn’t matter if they’ve been married for only 1 year or 7+ years, it hurts all the same.  And for the love of all that is sacred, don’t ask them if they are infertile!!!  Frankly, this topic is none of your business in the first place.

DO:  Find something else to talk about at the party.  There are thousands of other things you could talk about with Susie besides bringing up the fact that she hasn’t popped out any kiddos yet.  Susie will appreciate the good conversation.

If you ARE Susie…

DON’T:  Say what is going through your head, forgive Rhonda for she knows not what she does.

DO:  Churn out one of your polite answers as usual, “It’ll happen when the time is right!”; “Hopefully soon!”; “Oh, I know!  I can’t wait to have one of my own!”  Wait until you’ve left the premises to start bawling, it just makes everyone feel uncomfortable and it’ll be harder to face everyone the next day at Kimmie’s baby shower.

Yay, I hope I’ve made you aware!

Thursday, March 29, 2012

huitlacoche lasagne

Do you have a can of huitlacoche sitting in your pantry and you have no idea what to do with it?

Ok, maybe not.

But if you ever find yourself in this particular situation, I believe this rather non-authentic Mexican dish will solve your problem!

First, gather your ingredients:
Olive oil, onion, garlic, huitlacoche, poblano chile, dried epazote, Mexican table cream, melty Mexican cheese, and no-boil lasagne noodles.


Next, roast the poblano chile until the skin is mostly charred and blistered, and it starts to split slightly.  While the poblano chile is roasting chop up the onion and garlic.


 When the poblano chile is done roasting, put it in a bowl and cover with plastic wrap.  Let it steam for about 5 minutes, then peel the skin off, remove the seeds and stem, and slice into strips.


 Put half of the chopped onion in one pan and the other half in the other pan.  Once the onion is slightly translucent, add a minced clove of garlic in each pan.  Saute for about a minute.


 Add the can of huitlacoche to one pan and the poblano chile to the other.


 Add dried epazote to each pan.  Continue cooking for about 5 more minutes then turn off heat.


 Add the contents of the poblano chile pan to a blender along with the Mexican table cream; salt and pepper to taste.


 Add enough cream sauce to cover the bottom of an 8 x 8 baking dish.


 Add two no-boil lasagne noodles.


 Add more sauce to cover the noodles then add half of the huitlacoche mixture.


 Add a third of the shredded cheese; I had just a little bit of Blarney Castle cheese in the fridge, so I added that too.  Add another layer of noodles, cream sauce, huitlacoche, and cheese.  Your final layer should be noodles, the remaining cream sauce and cheese.


 Put it in the oven at 350º F for 35-40, but check after 30 min. since ovens vary slightly.  It comes out looking like this!


 I didn't let it cool long enough so it ended up being a sloppy mess, but I promise it's good!

Huitlacoche is basically corn smut.  It looks ugly and scary but my opinion is that it tastes pretty good and it tastes even better when it is fresh.  I can't really describe the taste perfectly, a bit earthy and smoky and mushroom-y; you really just have to taste it for yourself.  Next time you take a trip to Mexico, look for it on the menu and try it out.  Here is a good article if you want to read more about it.

And if you grow corn and you come across it, don't chuck it, sell it!  This stuff is pretty expensive, that one can of huitlacoche cost me $7!  You can make a nice profit from that ruined ear of corn.

Huitlacoche Lasagne
slightly adapted from this recipe by Las mañanas en el once

Ingredients:
1 large poblano chile
2 tablespoons olive oil
1 small yellow or sweet onion, chopped
2 garlic cloves, minced
1 (430g) can huitlacoche (a.k.a. cuitlacoche)
2 tablespoons dried epazote
2 (7.6 oz.) cans Mexican table cream (Nestlé media crema, which you can almost always find in the Mexican aisle at any grocery store)
6 sheets of no-boil lasagne noodles
2 cups manchego or panela or asadero or any melty Mexican cheese, shredded

Directions:
1.  Roast poblano chile on a griddle over medium-high heat.  Turn poblano chile every few minutes until skin is mostly charred, blistery and slightly peeling.  Place in a bowl and cover with plastic wrap. Let it sit for 5 minutes (now would be a good time to chop the onion and mince the garlic).  Peel skin, remove stem and seeds and slice into strips; set aside.
2.  Set two frying pans over medium heat, add 1 tablespoon of olive oil to each pan.  Once pans are hot, add half of chopped onion to one pan and other half to other pan, cook until slightly translucent.  Add 1 minced garlic to each pan, saute for about a minute.
3.  Add huitlacoche to one pan and sliced poblano chile to other pan.  Add 1 tablespoon of dried epazote to each pan, crushing in your hand as you sprinkle it over.  Stir and continue cooking for about 5 minutes; turn off heat.
4.  Add poblano chile mixture to a blender; add table cream and blend until completely pureed.  Salt and pepper to taste.
5.  Add enough cream sauce to cover bottom of an 8 x 8 baking dish.  Layer 2 lasagne sheets, a third of cream sauce, half of huitlacoche mixture and a third of shredded cheese; repeat this layer.  Final layer, 2 lasagne sheets, remaining cream sauce and remaining shredded cheese.
6.  Bake uncovered in 350º F pre-heated oven, 35-40 minutes (check after 30 minutes).  Let sit 10 minutes before serving.  Enjoy!


Saturday, February 11, 2012

pray always

I am NOT a morning person.  Just ask the handsome man who greets me with a cheery "good morning" when I wake up every day and gets an unintelligible grunt in return.

It takes a hot shower to wake me up.  After that I can function.  If I don't take a shower, it takes about 2 hours for me to start doing something productive.

Because I wake up like I've been in a coma for 10 years, saying a morning prayer is pointless.  It really is.  I've tried and it just doesn't happen.  They go a little something like this:

"Heavenly Father, I thank thee for...doze off for a bit...wake up...Heavenly Father, I thank thee for...doze off a bit more...wake up...where was I?...doze off...wake up...in Jesus' name, Amen."

Does that sound like a sincere prayer to you?  That's what I thought.

I don't recall ever saying a morning prayer last year and I wanted that to change.  I've been really lacking in the spiritual department so I made several goals to turn that around this year - including saying my morning prayers.

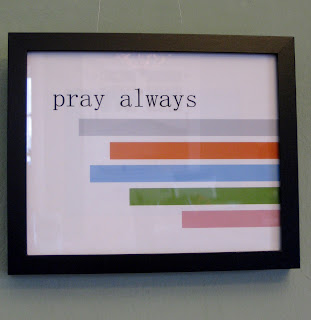
So I came up with a plan and made this:

I placed it right next to the front door and that's where I say my morning prayers now.

No, I'm not kneeling at my bedside a second after I've woken up, but I am alert and ready to start the day and I can say a prayer that is sincere and that my Creator can understand.


No matter how much of a rush I'm in to get out the door, I see this sign and remember it only takes a minutes to give thanks and to ask for blessings I desperately need.


Now, every morning before I head out the door for work I say my morning prayer.

And it feels good.

Sunday, January 29, 2012

alan carter's pie pastry

I remember making an apple pie as a freshman in college and serving it to my roommates and several gents.  Of course, I hadn't tasted it beforehand so we were all tasting for the first time and right about now you might expect me to say that it was the most delicious masterpiece I had ever created.

I    wish    I    could    say    that.

The filling was ok, I think it was store bought.  But the pastry was awful.  It had no flavor and was dry and pretty much resembled an inside-out cereal box.  I mean, I was chewing it and swallowing it as nonchalantly as I could all the while I was thinking these poor boys thought they were going to enjoy an apple pie like their mothers made.  I clearly remember the look on J's face, he was trying so hard to be nice as he ate that awful pie.  Sorry guys, I had no idea what I was doing, and I was embarrassed.  I mean, it clearly scarred me because, as you can see, I remember the details of this moment.

Ever since then, I had been in search for the perfect pie pastry.  I had been given a few recipes here and there that turned out ok, but none of them met my expectations.  What I wanted was a pastry that when you took it out of the oven, it looked like something you had purchased from a bakery that had been around for over 80 years; flaky, buttery, golden and beautiful.  A pastry that would have made those boys ask me to marry them on the spot.

Then, one day as I was devouring my November 2010 Better Homes and Gardens magazine I came across this:
A pie pastry recipe by Alan Carter with pictures on the previous pages of scraggly, flaky, delicious-looking pies.


People wait in long lines for slices of his pies?  Sour cream and vinegar in the pastry?  I was intrigued.  So I tried out Alan's pie pastry recipe and when I took out that apple pie from the oven...

I knew I had found THE ONE.

Yes folks, this is the pie pastry I'd been looking for, the one that had eluded me for 15 years!  I wanted to fly out to California right then and there and give Alan a big fat kiss on the cheek and tell him through tears he had changed my (pie-making) life forever.  Maybe some day...

For now, I'm going to share the recipe with you as well as some tips from Alan, plus some things I've learned along the way because honestly, this isn't your typical pie pastry.


You'll need all-purpose flour, sugar, kosher salt, baking powder, unsalted butter, ice-cold water, sour cream and vinegar.


 Mix the flour, sugar, salt and baking powder in a large bowl.  I just use a pastry blender to mix it together.


Cut the cold unsalted butter into large chunks with a knife and dump it into the flour mixture.


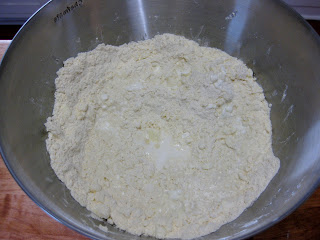
Cut in the butter with a pastry blender until you have small chunks of butter the size of peas.


Here is a close up of what it should look like.


Combine the ice-cold water, sour cream and vinegar; whisk it all together.


Add the liquid all at once to the flour mixture.


Quickly but gently stir to distribute, but DO NOT OVERMIX!


This is what it should look like.


Gently gather the dough and press it together in the bowl.  It will be quite crumbly, not something you're used to with your typical pie pastry, so don't freak out.  Cover and let it rest in the fridge.


 Once it has rested, divide it into three portions.  I take the dough and weigh it so I can divide it equally.


See?  It's a pretty crumbly dough.  For this particular recipe that I was making I only needed one pie crust, so I placed the other two portions in a resealable plastic bag and put them in the freezer for another use.


 Take your dough and gently shape into a disk on a lightly floured surface.


With your floured rolling pin, start to roll out the pastry, giving the pastry a quarter turn with every roll.  The edges will get crumbly so just press it back onto the disk as you roll it out; this part requires a bit of patience.  If you can, flip the disk over about half way through as you are rolling it out.


 Once it's rolled out to about a 1/4 inch, you are good to go.


 Here's a close-up, see the blotches of butter in the pastry?  That's what makes it so incredibly flaky!


Follow your pie recipe the rest of the way.  Here is a picture of a tarte tatin I made using the pie pastry.  The crust was flaky, buttery, golden and delicious - just like I had imagined!

Alan's Pie Pastry
recipe by Alan Carter of Mission Beach Café, BHG Nov. '10

Ingredients:
3 3/4 cups all-purpose flour
1 tablespoon sugar
1/2 to 1 tablespoon kosher salt*
1/2 teaspoon baking powder
1 3/4 cups cold unsalted butter
2/3 cup ice-cold water
2 tablespoons sour cream
1 teaspoon vinegar

Directions:
In a very large bowl, combine flour, sugar, salt and baking powder.  With a pastry blender, cut in butter leaving chunks the size of peas.  Always use chilled, not frozen or room temperature, butter.  Butter should feel like clay to the touch.  Combine ice-cold water, sour cream and vinegar.  Acid helps pie dough set up.  A little vinegar and sour cream added to the water does the trick.  Add liquid all at once to the flour mixture.  Quickly stir to distribute; do not overmix.  Do not overwork your pie dough.  Stir the wet ingredients into the flour and butter, then stop.  As it rests the dough will come together.  The dough should be slightly crumbly.  If your pie dough is ugly and lumpy with butter knots the size of peas, it's perfect.  Let rest in the refrigerator for at least 2 hours or overnight.  The finished dough should break, not stretch.  Divide into three portions; shape into disks.  You want a generous crust, so don't roll it too thin.  About 1/4 inch is good.  Always butter the pie dish.  Sometimes, especially with fruit pies, the juice sneaks under the crust and acts like glue, bonding the crust to the pan.  To prevent shrinking do not stretch the dough into the pie plate or over the top of the pie.  Use at once or wrap and refrigerate up to 3 days.  Or freeze up to 1 month.  Thaw overnight in the refrigerator if frozen.  Makes 3 single-crust pastries.

*Alan enjoys the contrast of a salty crust to sweet filling (as do I!).  For a more neutral crust, use the lower amount of salt.  Be sure to use kosher salt!  If you only have table salt on hand, reduce the amount of salt by half.

P.S.  Even though I love, love, love this pie pastry, it isn't practical for when you need to pre-bake a pie crust.  Because it has a lovely amount of butter, the crust will just melt to the bottom of the pie plate.  So either fill the entire pan with pie weights, don't pre-bake it at all (I'm sure it will be fine) or use a different recipe.  Same goes for making hand-held pies, just use a different recipe.  Or, perhaps you can use it for hand-held pies if you cut back on the butter but I'm not about to experiment with that.  This pie pastry is perfect just for pies in a dish.